React Native Vector Icon allows you to add custom icons for your app. You can change its color, size, position, multiple styling, etc. This library also includes all of your basic icon sets like FontAwsome 5 and MaterialIcons (To learn more about using the built-in fonts refer to this post). Or you can upload your own custom icons by using IcoMoon to create a custom set of icons, this is what we will cover in this post.
What is IcoMoon.
IcoMoon is an icon solution that provides three main services for you. They are the Vector Icon Packs, The IcoMoon App, and hosting icons as SVGs or fonts.
- Vector Icon Packs: IcoMoon provides many free icon packs. You can find them in the library tab of the IcoMoon app. Each of them has a license link that you can refer to. Besides, these free icon, you can purchase three high-quality premium icon packs separately.
- The IcoMoon App: This app allows you to browse and search for the icons you need quickly. You can download these icons, do some basic editing, import your own icons, generate icons in SVG, Polymer, PDF, XAML, PNG, and CSS sprites.
- Hosting Icons as SVGs: In addition to icon fonts, the IcoMoon app allows you to download your chosen icons as SVGs, which can be used as inline SVGs in HTML.
IcoMoon App Icons is the service that we are interested in. This is a free and open-source application that lets you convert a set of SVG icons to fonts. It is a front end only app and does not upload your icons anywhere, so there will be no privacy concerns!
First we have to create a custom icon set.
Once the site is open, remove the current set (if there is one) and create a new empty set and give it your preferred name. (it is recommended that you rename everything now, before downloading and make sure you use the same name everywhere).
Drag and drop your SVG files onto the website.
Highlight (select) the files that you want to export. Select all if you want to export all the icons.

Once selected click the Generate Fonts (in the lower right-hand corner of the site) and download the zip file to your system. (You can click the gear icon and rename the download if you would like, again remember that you should keep the names the same)
The zip file will contain a selection.json file and a fonts folder containing a .ttf file. We only need these two files to use fonts in react-native.

Installing React-Native-Vector-icons
Now it is time for use to add react-native-vector-icons to our project. Install react-native-vector-icons library with the following commands.
npm install --save react-native-vector-icons
npx pod-install
Or
yarn add react-native-vector-icons
npx pod-install
We need to link the react-native-vector-icons library to use it. This is where other guides will fall short. Most guides were written before the release of 0.60 and tell you to run a react-native link react-native-vector-icons command (DO NOT RUN THIS COMMAND). With the release of React-Native 0.60 libraries is auto-linked, you can learn more about auto-linking here. This is where most will run into issues. To avoid these issues we will need to link our custom font manually.
IOS
Open [project].xcworkspace in Xcode.
Create a new Group in the project root and call it Fonts

- Copy your custom font file (the .ttf) into the new font file that you created. Make sure that you check the Copy items if needed, create folder references, and that the project is selected under “add to targets”

- Open ios/[project]/Info.plist file and add the following code to it (In VScode). After the <false/>
<?xml version="1.0" encoding="UTF-8"?>
<!DOCTYPE plist PUBLIC "-//Apple//DTD PLIST 1.0//EN" "http://www.apple.com/DTDs/PropertyList-1.0.dtd">
<plist version="1.0">
<dict>
    ...
  <key>UIViewControllerBasedStatusBarAppearance</key>
  <false/>
  <key>UIAppFonts</key>
  <array>
    <string>{Name of font file}.ttf</string>
  </array>
</dict>
Lastly, clean the build folder and rebuild the project.
ANDROID
Configuring Android is much simpler, open android/app/build.gradle file and add the following line. Below apply from: “../../node_modules/react-native/react.gradle”;
apply from: "../../node_modules/react-native-vector-icons/fonts.gradle"Then copy your custom font file to android/app/src/main/assets/fonts If the folder does not exist then create it.
Lastly, open Android project in Android Studio to execute Gradle sync automatically
How to Use
Put the JSON file (selection.json) in the root of the project.
Create a custom component in your project called CustomIcon.js and add the following code. (make sure you change the relative paths to match your project)
import {createIconSetFromIcoMoon} from 'react-native-vector-icons';
import icoMoonConfig from './selection.json';
export default createIconSetFromIcoMoon(icoMoonConfig);
That’s it! To use a font simply import the file as a React component and pass the icon name and size (optional) or even style.
import CustomIcon from './components/CustomIcon.js'

<CustomIcon name='android' /> //To use the icon
<CustomIcon name='android' size={25} /> // To pass size
<CustomIcon name='android' style={styles.androidIcon} /> // To pass custom style
To see the full code in action checkout the git repo.
Tested with:
ReactNative version 0.63
React-Native-Vector-icons version 7.1.0
IOS version 14.2
Android version 11.0
Gotcha that I have found.
I have found that after running npx pod-install (a second time) I end up getting a bunch of errors. These errors are related to duplicated ttf files (only happens on IOS). These errors are related to auto linking, when you run pod-install, react is creating a link between your project and the react-native-vector-icons files in the node modules. We can correct this by simply deleting the links in our ios code.
Removing the Auto Linked Files.
Open [project].xcworkspace in Xcode.

Click on the project name in the file directory on the left (see highlighted text in image).
Make sure that your project is selected under targets (in the middle)

Then click on Build Phases.

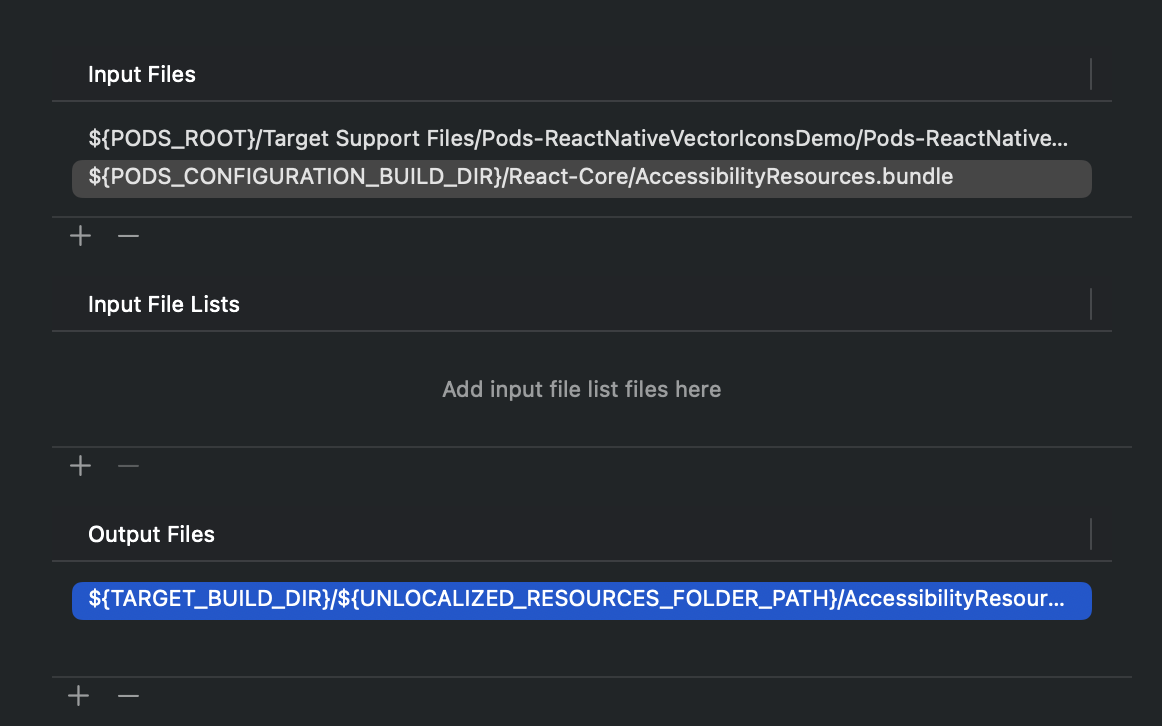
Next we need to locate the [CP] Copy pods Resources.
Locate the input files section and you should see a bunch of links to the font files in the node modules folder.
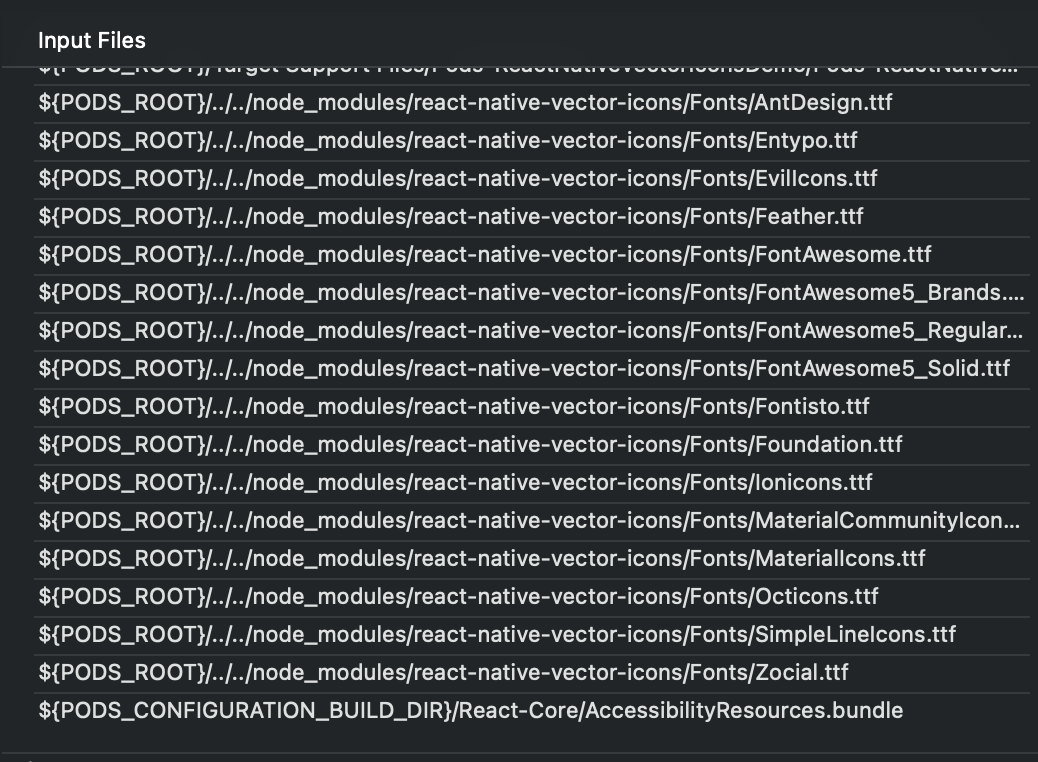
We want to select all of them and delete them, you can click on the first one then shift + click the last one and it should select all of them for you. Make sure you only delete the duplicate fonts.
Then we need to find the output files

And delete all of these files, again make sure you only delete the font files.
In the end the input and output should look something like this.