Have you ever came back to a project only to find a cryptic error awaiting your return? You may think, “Whats going on?! I haven’t changed a single line of code!”

These type of errors are a common issue that you can encounter, especially if you only have one version of node/npm installed on your system. As time goes on you may update to the latest and greatest node versions only to find your old projects break and throw funny errors. Well, I have good news, there is a cool command line tool you can use to bring stability to your projects and allow you flexibility to use whatever version of node you need.
Many people have already heard of NVM, or the “Node Version Manager”. NVM allows you to switch node versions quickly and easily. NVM is a tool I see being recommended over and over by many tutorials out there but they usually only show you the basics to get going. Well I want to show you some quick tips to help you improve NVM skills or show you why you want to install NVM today. If you haven’t installed it and are using a single node package then I highly recommend you go there now and install it (and it will also make the rest of the tutorial easier to follow).
There is a lesser known feature of NVM which can help you explicitly declare a projects node version. This way when you come back to the code later on you can run a command and use to that version required for the project. I created an example repository you can check out to follow along with this post. Just clone it on your computer and have NVM installed to follow along.
As you see in this repository there is a .nvmrc file in the root of the project. If you open that up you will see a version number. In this case you should see:
v10.23.0This node version is a bit older but it will work with the project which uses an older gulp version, gulp 3.x. Whenever you see one of these .nvmrc files you need to use that version to work with that project. So to use that version you run the command:
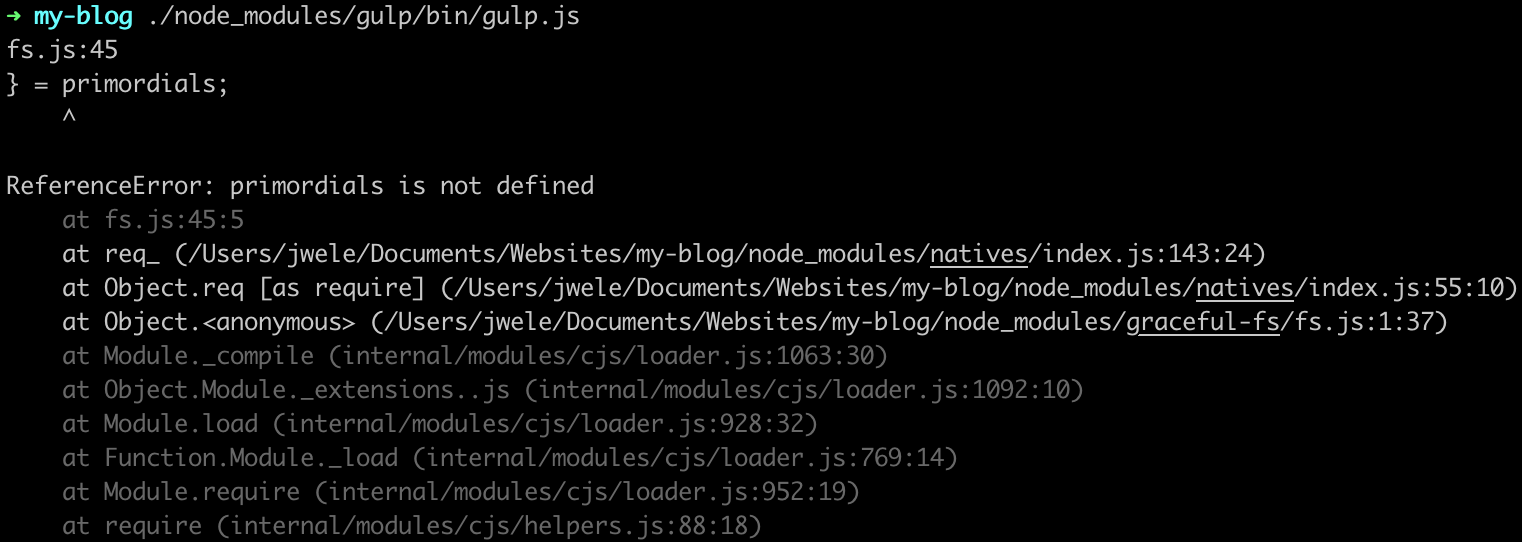
nvm useIf you run that in the example repository you should see nvm switch to that version like below:

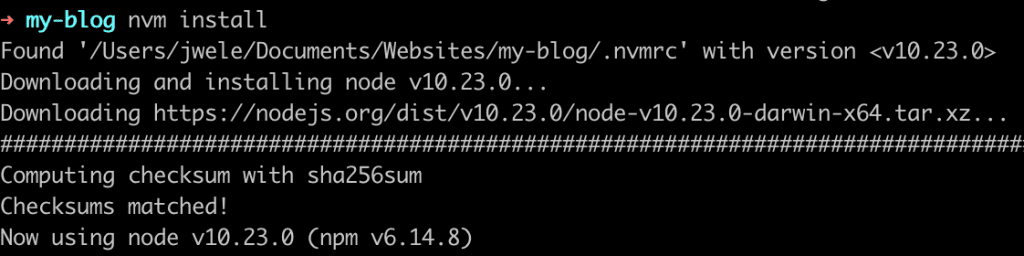
Unfortunately, as you can see in the screenshot, if you do not have that exact version installed then it will tell you to run a subsequent nvm install command to download and install that version of node. So if you follow it up with a:
nvm installThen it will install the version and switch to it.
Doing all this is still way better than uninstalling node and hunting down an old installer and praying that works. So you may be asking, is there a better way? The answer is yes!
If you use a modern shell, such as bash or zsh, then there is shell script you can add to your shells configuration file to automatically nvm use and install the node version defined in the .nvmrc file when you change into a directory that has a .nvmrc file in it. To install this integration for the Bash shell you can add this script to your .bashrc file in your home directory. For other major shells like zsh or fish you can check the up to date instructions on the github repo to see how to integrate NVM into your shell.
# Put this in your ~/.bashrc file
find-up() {
    path=$(pwd)
    while [[ "$path" != "" && ! -e "$path/$1" ]]; do
        path=${path%/*}
    done
    echo "$path"
}

cdnvm() {
    cd "$@";
    nvm_path=$(find-up .nvmrc | tr -d '\n')

    # If there are no .nvmrc file, use the default nvm version
    if [[ ! $nvm_path = *[^[:space:]]* ]]; then

        declare default_version;
        default_version=$(nvm version default);

        # If there is no default version, set it to `node`
        # This will use the latest version on your machine
        if [[ $default_version == "N/A" ]]; then
            nvm alias default node;
            default_version=$(nvm version default);
        fi

        # If the current version is not the default version, set it to use the default version
        if [[ $(nvm current) != "$default_version" ]]; then
            nvm use default;
        fi

        elif [[ -s $nvm_path/.nvmrc && -r $nvm_path/.nvmrc ]]; then
        declare nvm_version
        nvm_version=$(<"$nvm_path"/.nvmrc)

        declare locally_resolved_nvm_version
        # `nvm ls` will check all locally-available versions
        # If there are multiple matching versions, take the latest one
        # Remove the `->` and `*` characters and spaces
        # `locally_resolved_nvm_version` will be `N/A` if no local versions are found
        locally_resolved_nvm_version=$(nvm ls --no-colors "$nvm_version" | tail -1 | tr -d '\->*' | tr -d '[:space:]')

        # If it is not already installed, install it
        # `nvm install` will implicitly use the newly-installed version
        if [[ "$locally_resolved_nvm_version" == "N/A" ]]; then
            nvm install "$nvm_version";
        elif [[ $(nvm current) != "$locally_resolved_nvm_version" ]]; then
            nvm use "$nvm_version";
        fi
    fi
}
alias cd='cdnvm'
cd $PWD
After you add this to your ~/.bashrc you can run:
source ~/.bashrcTo load the changes into your current terminal session. Now whenever you change into a directory with a .nvmrc file, like the one in my example repo, you should see a message similar to the one below indicating it was able to successfully switch to the node versions. The best part is you wont have to execute a single nvm command, it will automatically nvm use, nvm install for you!

Here is a quick list of all the benefits of switching to NVM and .nvmrc files
- Stability: You wont come back months later with a shiny new node version just to have your project break or its build scripts throwing weird errors at you by saving the version your project requires to the .nvmrc file.
- Explicit: Other developers or users of your application will instantly see the needed node version from the .nvmrc in the root of the project.
- Speed: Manually uninstalling and installing node versions for all the different projects you have is annoying. Using the shell integration you can almost not even think about switching node versions as long as someone has created a .nvmrc file for the code.
And before you go I have a few other tips and tricks to leave you with. For instance, if we go back to the example repository, you will notice that the version in the node file is very explicit. What I mean by that is it will install the exact node version “v10.23.0” every time. This is fine, but what if there is a security update, or another minor update. These typically will have no effect on your projects stability and are in fact meant to improve the stability/security of your code. So what can we do?
Instead of setting the .nvmrc file to an exact node version you can use things “10.*” or “10” or “10.23.*” which are not exact version numbers and NVM will install a version that fulfills that requirement. This means when node releases minor updates you wont have to worry about upgrading the .nvmrc file in all your projects.
Node will give their LTS or “Long Term Support” releases a code name. In our example project we used node v10 which is a LTS release with the code name “Dubnium“. NVM will also use these code names. So for example you could use “lts/dubnium” in the .nvmrc file and NVM will install the latest version of that release.
LTS releases are the pinnacle of stability as they will receive security updates for years after their releases. You can use the wildcard symbol “*” with these code names to, so if you wanted to pin the latest long term support LTS release you could use “lts/*” and the wildcard will match the latest LTS version available. But NVM will not test that your code works with the latest LTS release.
As you can see there are a ton of ways to define the projects node version but keep in mind, as alluded in the paragraph above, the more general the .nvmrc file the more prone you are to encounter errors because it increases surface area of potential incompatibilities by allowing more node versions than you may originally expect/have tested. You can’t expect your code to work with every future LTS release for instance from now on.
Another note about the shell integration scripts that we added earlier is that when you are not in a directory with a .nvmrc file the shell script will search up the directory tree recursively in the parent directories looking for a .nvmrc file. If one is not found then it will fallback to the version you set as the system default. Another thing you can do is put a more generic .nvmrc version of “lts/*” as your home folders ~/.nvmrc version. This means that instead of falling back to the system version you can fallback to a more generic LTS release when a project does not have a .nvmrc file. As LTS node releases come out over time you wont have to go back to the .nvmrc file in your home directory to update it if you use the wildcard as shown above.
I hope this quick introduction to .nvmrc files was helpful and has convinced you to use nvm and .nvmrc files. I think NVM is one of the most helpful tools out there for Javascript development. One last note is that if you wanted to be super explicit about the node or npm requirements you can also define it in your package.json. Check out the “engines” option that you can add to your package.json file in the npm documentation. But note that NVM will not use this package.json engine option as it only reads the .nvmrc files.